soul
User Authentication in Soul
Soul incorporates a robust user authentication system that handles user accounts, groups, permissions, and cookie-based user sessions. This section provides an overview of how the default implementation works.
Authentication is switched off by default in Soul, but is enabled when either of the -a or --auth flags are provided at the command line.
Overview
The Soul authentication system handles both authentication and authorization. Briefly, authentication verifies a user is who they claim to be, and authorization determines what an authenticated user is allowed to do. Here, the term “authentication” is used to refer to both tasks.
The auth system consists of:
- Users
- Roles and Permissions: A generic way of applying labels and permissions to more than one user.
- A password hashing system
- APIs for logging in users or restricting content
- JWT based access tokens
The authentication system in Soul aims to be very generic and doesn’t provide some features commonly found in web authentication systems, such as:
- Password strength checking
- Throttling of login attempts
- Authentication against third-parties (OAuth, for example)
- Object-level permissions
Users
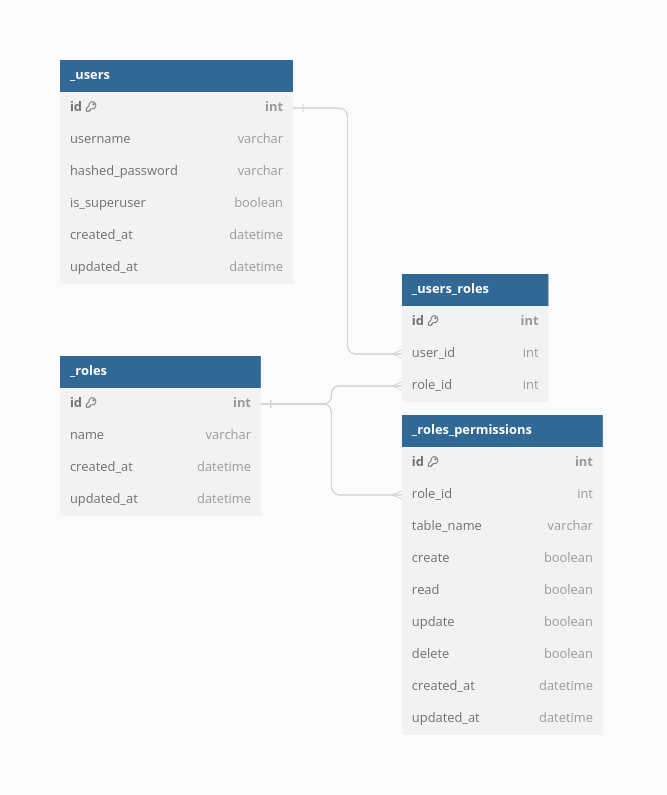
The _users table serves as the central component of the authentication system. Each row in the _users table represents an individual who interacts with your Soul instance. This table is crucial for enabling various functionalities, such as access restriction, and user registration.
Superusers, distinguished by the is_superuser attribute set to true, are a special type of user in Soul. They can bypass any permissions and restrictions, effectively granting them “God-mode” within the system, including being able to access the /api/tables and /api end-points. Authorization limitations do not apply to superusers.
The attributes of the _users table are:
- id int
- username varchar
- _hashed_password varchar
- _salt varchar
- is_superuser boolean
- created_at datetime
- updated_at datetime
Note that when Soul boots up, it looks for a table called _users (Otherwise Soul creates _users table) which holds the Users mentioned above.
Modifying Superusers
Due to the sensitive nature of the superuser status, it is not possible to change the is_superuser attribute of a user through the API.
Instead, you can update superusers using the command line.
$ node src/server.js updateuser --id=1 --password=newstrongstring // To update password of a superuser with id 1
$ node src/server.js updateuser --id=1 --is_superuser=true // To promote a user with id 1 to superuser
Roles
Roles are a generic way of categorizing users so you can assign permissions to those users. A user can belong to any number of roles.
If we have an editor role, and a _roles_permissions entry for the posts table that allows update, then any user with that role will be able to update posts.
The attributes of the _roles table are:
- id int
- name varchar
- created_at datetime
- updated_at datetime
Roles Permissions
Using a table called _roles_permissions we can assign permissions to roles.
The attributes of this table are:
- id int
- role_id int
- table_name varchar
- create boolean
- read boolean
- update boolean
- delete boolean
There is unique constraint on the combination of role_id and table_name attributes,
to prevent duplication of permissions for the same role and table.
Default Role
Once a new table is created, Soul will automatically create a new _roles_permissions row for the default role and the new table, with the following permissions:
- create: false
- read: true
- update: false
- delete: false
Which basically means that any user can read the table data, but can’t create, update or delete data.
Soul uses the default role to assign permissions to new users.
The same happens when Soul boots up, but for all existing tables, making sure that all tables have the default role assigned to them.
Users Roles
To assign roles to users we have a join table called _users_roles with the following attributes:
- id int
- user_id int
- role_id int
Authentication
Soul uses cookies and middleware to hook the authentication system into request objects.
These provide a req.user attribute on every request, which represents the current user. If the current user has not logged in, it is set to null.
Obtain Access Token
To be able to use private APIs, users need to obtain an access token, which is a JWT token consisting of this payload:
- username
- is_superuser
- roles
For security reasons, Access tokens have a very short lifetime, and once expired, they can be refreshed using another API called Refresh Access token. Refresh tokens have a much longer lifetime, and both access and refresh tokens are provided to the user upon logging in.
Register New Users
To register new users, you need to create a new user using the /api/tables/_users/rows/ endpoint, and then assign roles to that user using the /api/tables/_users_roles/rows/ endpoint.
Note that you need to be logged in using a user with a role that has creating users permission.
Additionally, it’s important to note that the /api/tables/_users/rows/ endpoint functions slightly differently compared to other /api/tables/<table_name>/rows/ endpoints. When creating or updating user data through this endpoint, we need to provide the raw passwords, which are then automatically hashed before being stored in the _hashed_password field. This extra step enhances the security of the stored passwords.
When creating a user, the required fields are username and password. However, you also have the flexibility to include additional optional fields. To do this, you will need to modify the schema of the _users table in your database using a suitable database editor GUI tool. Simply add the desired field(s) to the database schema for the _users table. Once the schema is updated, you can pass the optional field(s) from your client application during user creation.
Furthermore, when retrieving user data, the endpoint automatically filters out sensitive information such as the _hashed_password and _salt fields. This precautionary measure is in place to address security concerns and ensure that only necessary and non-sensitive information is included in the returned results.
Revoked Refresh Tokens
When you send a request to log in to Soul using the /token/obtain endpoint, you will receive Access and Refresh tokens. These tokens can be stored in a secure client environment. You can then send a request to the /token/refresh endpoint to refresh your access token when it expires.
When you log out of Soul, the Access and Refresh tokens are removed. However, there might be instances where you log out before the refresh token expires, allowing these tokens to be reused by other users. To handle this issue, Soul saves removed refresh tokens temporarily in a table named revoked_access_tokens. Each time you attempt to refresh your access token, Soul checks if the Refresh token you are using is valid. If you try to reuse a revoked refresh token, Soul will throw an error.